<<<
etheli.com Home Page
FPV EPP Foam Combat Plane 28"
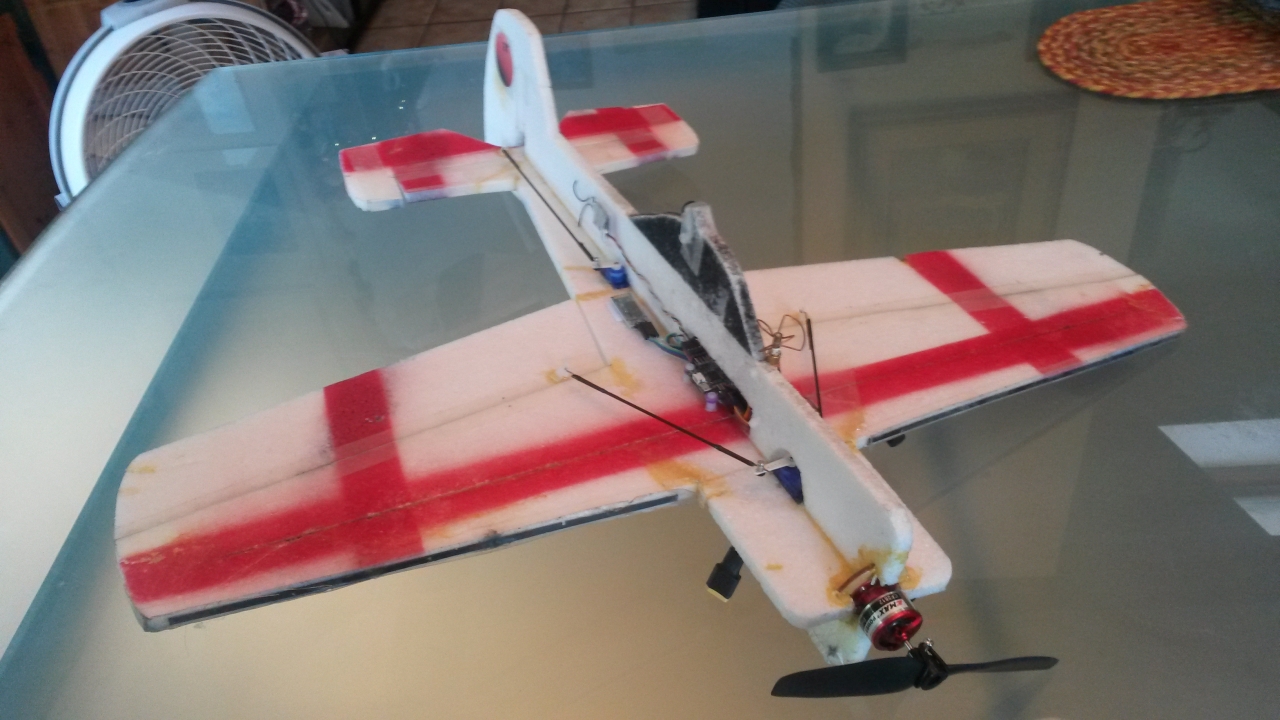
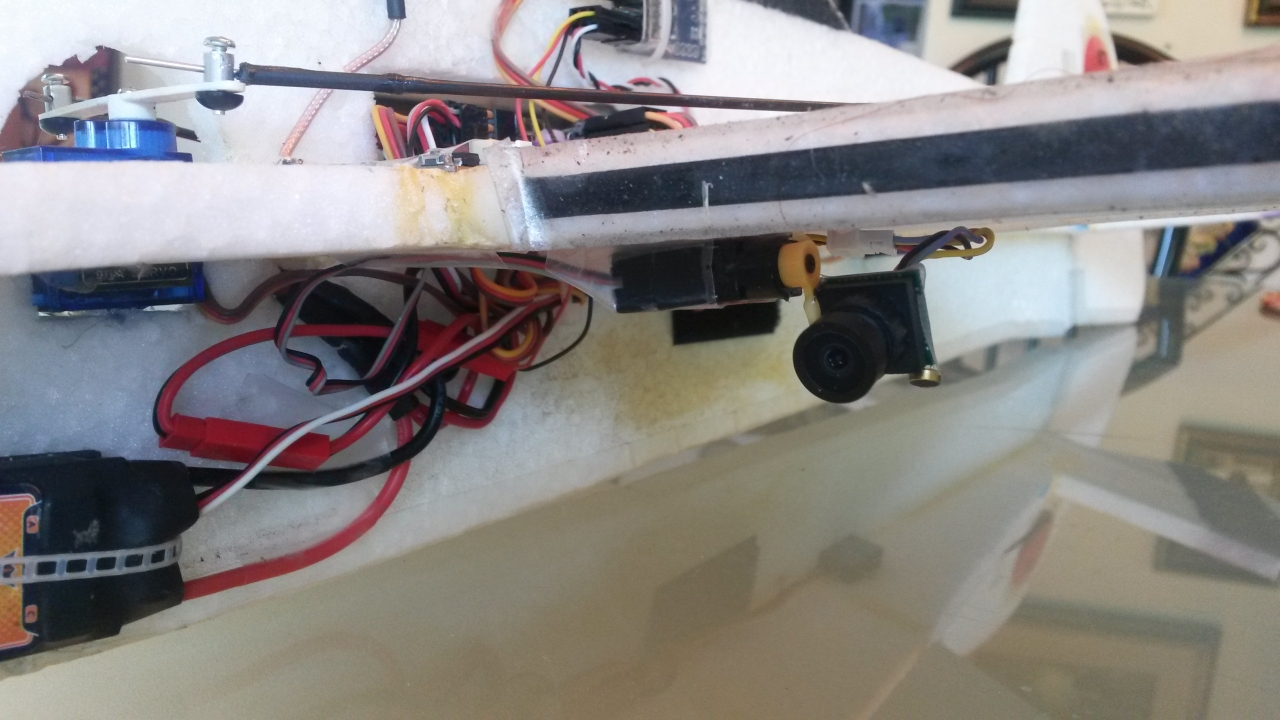
This build takes a 28"
EPP foam plane and adds cameras and video transmitter for FPV
flight
and streamer-combat fun. Features of this plane:
- Front and rear facing cameras, switchable via R/C channel
input
- Betaflight-compatible flight controller
- Gyro-stabilized, self-leveling and pass-through
flight modes
- On-screen display (OSD) on video
- Video-transmitter frequency configurable through OSD, Taranis 'lua' scripts, or VTX CLI settings
- FrSky SBUS receiver (with F.Port 2-way telemetry)
For the basic build of the plane, see my EPP
Foam Combat Plane 28" article.
See the FPV parts list below for a list of the
FPV-specific parts.
See here for
a gallery of pics.
The weight (complete) without battery is about 320g. (Not a
lightweight flyer. This plane is built for speed and agility, to
be able to survive collisions, and to be easily repaired.)
Flight time with a 3S 850mAh battery is 4-6 minutes.
Notes:
Having the Betafight flight controller on board provides support for
OSD, FrSky SBUS receiver, easy VTX frequency configuration, and
stabilized flight modes. The plane flies great in gyro-stabilized
(acro) mode. It took a bit of research and tweaking to come up
with a good Betaflight configuration for airplane use (the Mixer.md doc is a good reference).
Using Matek F411-Wing Flight Controller:
(The original build used an F3 Omnibus flight controller; see below for the detailed write-up on that.)
The Matek F411-Wing flight controller can be loaded
with Betaflight and configured for use with the plane. (The
Matek F411-WSE could
also be used.)
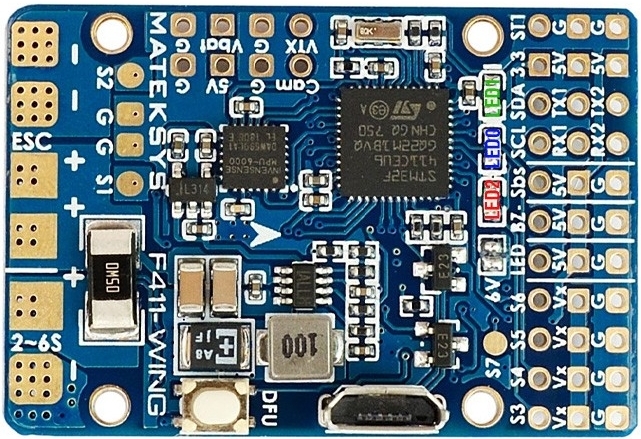
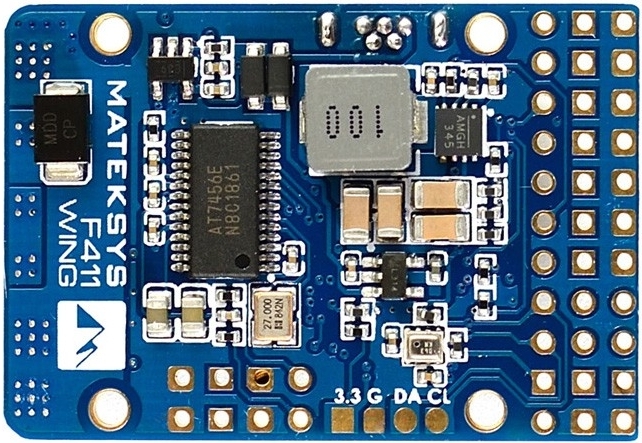
See here for pinout information, here for a general wiring diagram, and here for a pic of my test rig.
The connections for motors and servos are as follows:
S1 <- Throttle
S3 <- Aileron
S4 <- Elevator
S5 <- Rudder
S6 <- Camera tilt [AUX2 (ch6)]
S7 <- AUX3 (ch7)
The resources are allocated as follows:
resource MOTOR 1 B04 # S1 <- Throttle
resource SERVO 1 B06 # S3 <- Aileron
resource SERVO 2 B07 # S4 <- Elevator
resource SERVO 3 B03 # S5 <- Rudder
resource SERVO 4 B10 # S6 <- Camera tilt [AUX2 (ch6)]
resource SERVO 5 A15 # S7 <- AUX3 (ch7)
# Rule Servo
Source Rate Speed
Min Max Box
smix 0 2 0 100 0 0 100 0 # Servo 1 Aileron <- Stabilized roll
smix 1 3 1 100 0 0 100 0 # Servo 2 Elevator <- Stabilized pitch
smix 2 4 2 100 0 0 100 0 # Servo 3 Rudder <- Stabilized yaw
smix 3 5 9 100 0 0 100 0 # Servo 4 <- RC AUX2 (ch6)
smix 4 6 10 100 0 0 100 0 # Servo 5 <- RC AUX3 (ch7)
Any needed servo reversing should be
done in the flight controller (not in the transmitter). The servo-reversing commands look like this (use only the ones you need):
smix reverse 2 1 r # reverse Servo 1 Aileron
smix reverse 3 0 r # reverse Servo 2 Elevator
smix reverse 4 0 r # reverse Servo 3 Rudder
smix reverse 5 2 r # reverse Servo 4 RC AUX2 (ch6)
smix reverse 6 9 r # reverse Servo 5 RC AUX3 (ch7)
See here for the basic Betaflight settings for the F411-Wing board. See here
for settings that include tuning and OSD values (and have
"gyro_1_align_yaw = 1800" for configuring the board mounted with
180-degree rotation). For the Matek F411-Wing the Betaflight
board name is "MATEKF411".
Using F3 Omnibus Flight Controller:
See here
for the basic Betaflight settings, which lay out on the F3 Omnibus board
like this:
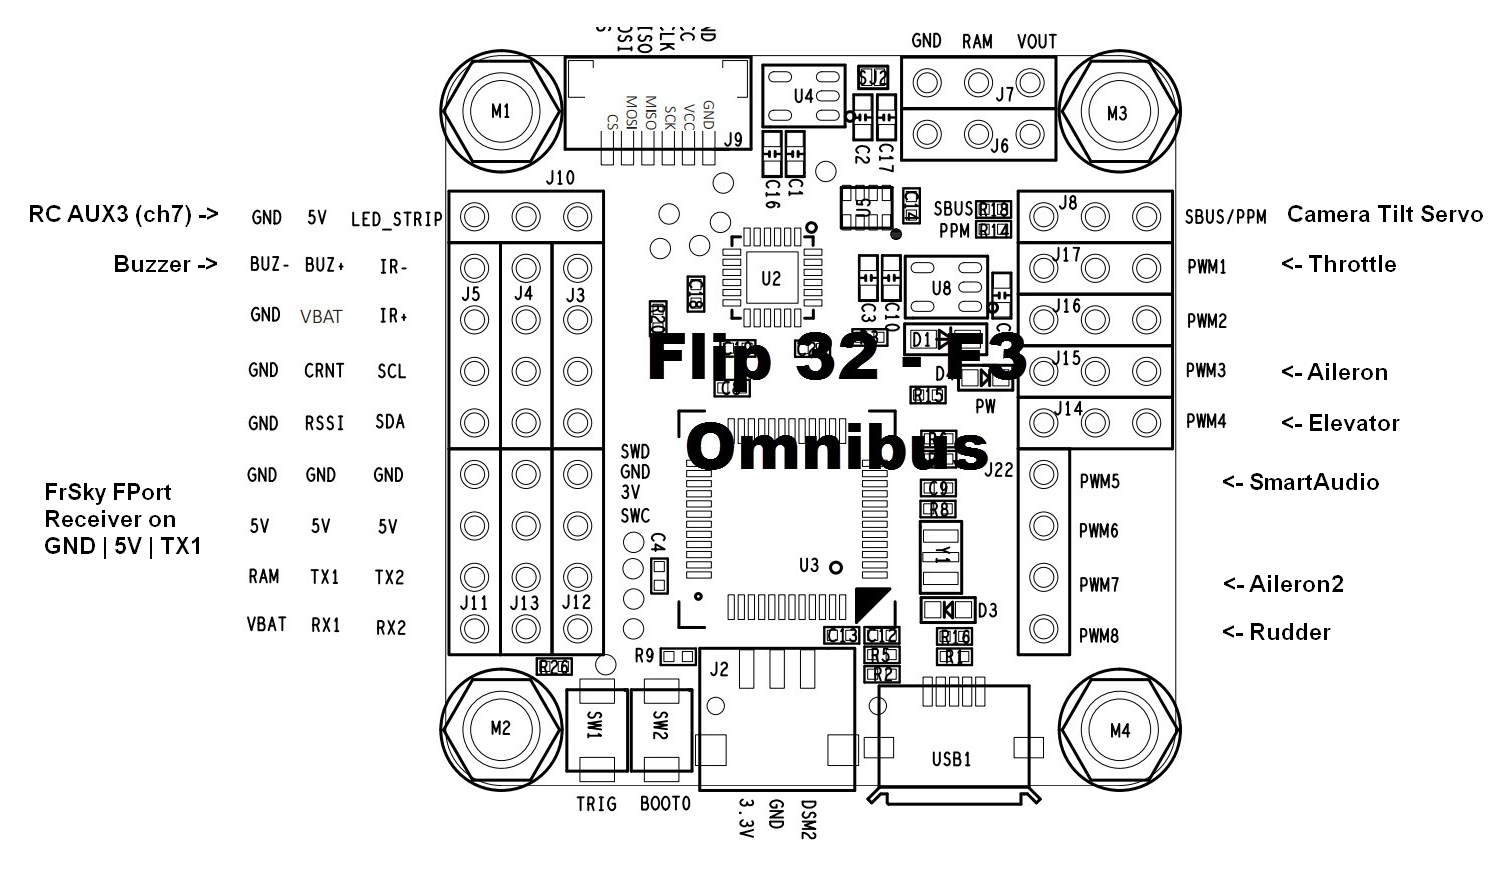
The resources are allocated as follows:
resource MOTOR 1 B08 # motor PWM1 <- Throttle
resource SERVO 1 A02 # motor PWM4 <- Elevator
resource SERVO 2 A03 # motor PWM3 <- Aileron
resource SERVO 3 B07 # motor PWM7 <- Aileron2
resource SERVO 4 B06 # motor PWM8 <- Rudder
resource SERVO 5 B04 # SBUS/PPM <- Camera tilt [AUX2
(ch6)]
resource SERVO 6 A08 # ledstrip <- AUX3 (ch7)
# Rule Servo
Source Rate Speed
Min Max Box
smix 0 2 1 100 0 0 100 0 # Servo 1 Elevator <-
Stabilized pitch
smix 1 3 0 100 0 0 100 0 # Servo 2 Aileron <- Stabilized
roll
smix 2 4 0 100 0 0 100 0 # Servo 3 Aileron2 <-
Stabilized roll
smix 3 5 2 100 0 0 100 0 # Servo 4 Rudder <- Stabilized
yaw
smix 4 6 9 100 0 0 100 0 # Servo 5 <- RC AUX2 (ch6)
smix 5 7 10 100 0 0 100 0 # Servo 6 <- RC AUX3 (ch7)
Because of internal-processor-timer constraints the PWM2 output cannot
run a servo (only a motor). Any needed servo reversing should be
done in the flight controller (not in the transmitter). The
servo-reversing commands look like this:
smix reverse 2 1 r # reverse Servo 1 Elevator
smix reverse 3 0 r # reverse Servo 2 Aileron
smix reverse 4 0 r # reverse Servo 3 Aileron2
smix reverse 5 2 r # reverse Servo 4 Rudder
smix reverse 6 9 r # reverse Servo 5 RC AUX2 (ch6)
smix reverse 7 10 r # reverse Servo 6 RC AUX3 (ch7)
In my setup I needed to reverse the Elevator and Rudder servos.
I connected the flight battery to the VBAT pin on the flight
controller. The speed controller has a 5V BEC output, so with it
and the servos connected to PWM pins, the 5V is supplied to the servos.
The flight-controller board is mounted with four M3x8mm Nylon Screws, going into four 5.6mm x 13mm M3 Nylon Threaded Spacers glued into
the foam. I also used four rubber grommets, but I don't think they really
make much difference (in terms of stopping vibrations).
The video transmitter (VTX) is a TBS
Unify Pro 5G8 HV (alt src), which supports SmartAudio for
configuring the
frequency and power output. I powered the VTX directly off the
flight battery, and supplied 5V for the cameras via the VTX. The
VTX SmartAudio configuration support requires a connection from the
smart-audio pin of the TBS Unify VTX to the "TX" line of a UART on the
flight
controller. (See here for info on SmartAudio.)
With the VTX setup for SmartAudio configuration, the video frequency
can be configured using the on-screen video display and the R/C
transmitter sticks; see the SmartAudio CMS OSD guide
in the Betaflight wiki for more information. The video frequency
may be set using band/channel values, or to a frequency in MHz.
Starting with the v3.3 release of Betaflight, the video frequency may
be configured using VTX CLI settings; see here for info.
I put the front-facing camera on a tilt servo -- I used a Power HD DSM-44 servo, but most any lightweight
servo should work. Adding a head tracker (like this
one)
lets you look up and down while flying, which I find helps a lot.
To switch between the front and rear-facing cameras I run them through
a video
switch
controlled by an R/C channel from the transmitter. I have it
setup so the view will switch to the rear when I hit a toggle switch,
or when I turn the head tracker enough to "look back." I have the
camera tilt on R/C channel 6 and the video switch on channel 7.
In this build I used an FrSky XSR receiver with its firmware updated to
the F.Port Protocol
Firmware. (See here
for an article on updating FrSky receiver firmware, and here for info on F.Port.) The FrSky
R-XSR receiver would also work here.
With a receiver connected via F.Port (or SmartPort), flight controller
and VTX settings can be configured via 'lua' scripts on a Taranis /
OpenTX transmitter. (See here for 'lua' scripts and here for info article.)
I found that it's possible to set the VTX frequency while the flight
controller is powered via the USB port and the VTX is not transmitting
(because the battery is not connected) using the Taranis or the VTX CLI
settings, and then have the frequency be applied when the copter is
restarted. (Be aware that after the change the VTX will transmit
at the "old" frequency for a second or two while the flight controller
is booting up.)
To get an RSSI (signal strength) indicator for the receiver, a
configuration needs to be setup in the Taranis that routes RSSI to a RC
channel. The method in this
article
worked for getting RSSI directed to a channel, but the range of values
was not right. (The 'rssi_scale' setting in Betaflight v3.3 seems
to
have no effect for this type of setup.) To fix the range I ended
up
directing the RSSI to a spare channel (CH26) and then to the channel
that
goes to the flight controller (CH16), applying weights and offsets
along the way:
* Taranis: Input - create "rss" / RSSI input
(weight=100)
* Taranis: Mixer CH26 with Source=(I)rss and
Weight=500
* Taranis: Mixer CH16 with Source=CH26, Weight=360
and Offset=-85
* Then set Betaflight RSSI Channel to AUX12 (CH16)
Also, to get it so the RSSI is displayed as 0% when the RC signal is
lost, in the Betaflight Configurator Failsafe 'Channel Fallback
Settings' do AUX12="Set
1000" (or set in CLI: rxfail 15 s 1000). With these things
setup you can get a nice 0-100% RSSI displayed on the video OSD.
Here are the R/C channel assignments in my setup:
ch01: Throttle
ch02: Aileron
ch03: Elevator
ch04: Rudder
ch05: Arm Throttle
ch06: Camera Tilt
ch07: Camera Select (front/rear)
ch08: Flight Mode (acro, horizon, passthru)
ch09: Beeper
ch16: RSSI
I configured three flight modes, acro (gyro stabilized), horizon (self
leveling), and pass-through, on a three-position switch (switch SD on
my Taranis Q X7 transmitter). In pass-through mode the R/C
channels control the servos directly, and I configured expo in the
transmitter for that mode only: 65% aileron, 65% elevator, 50%
rudder. No expo is needed for the other two flight modes.
Channel trim should not be applied in the transmitter, as it will
adversely affect the self-leveling flight mode.
On my Taranis Q X7 I have the switches assigned as follows: SA =
Arm, SD = Flight Mode, SF = Beeper, SH = Camera Select, S2 (knob) =
Camera Tilt
For the self-leveling flight mode to work well, the plane should be in
a somewhat pitch-up position when the accelerometer is calibrated in
Betaflight. The calibration can also be trimmed up in that
direction.
If the flight controller has a barometer, it can be used to show
altitude in the OSD. Some open-cell foam should be attached over
the barometer chip to block sunlight and wind. There is an
altitude
hold ("Baro") mode in Betaflight, but it doesn't seem to be implemented
for airplane.
For tuning I needed to lower most of the values to tame oscillations,
and I increased the servo 'rate' values to increase the responsiveness
of the controls.
See here
for a flight-controller configuration I've been using (in the settings directory).
See here for my Taranis Q X7
transmitter-settings file that includes this model ("EPPCom28").
A Bluetooth HC-06 module
can be connected to UART2 on the flight controller to provide a handy
wireless connection to a PC (running the Betaflight
configurator). In the configurator, the UART should have "MSP"
selected. The HC-06 module needs to be configured to a 115200
baud rate; see here for some more bluetooth information.
Alternate motor: Turnigy D2822/14 Brushless Outrunner 1450kv
https://hobbyking.com/en_us/d2822-14-brushless-outrunner-1450kv.html
FPV Parts List:
Flip 32 - F3 - Omnibus v3 (w/ Baro option) $20.99
http://www.readytoflyquads.com/flip-32-f3-omnibus
https://www.banggood.com/Original-Airbot-Omnibus-F3-Pro-V2...1320254.html
FrSky XSR 2.4GHz 16CH ACCST Super Mini Receiver $19.99
https://www.getfpv.com/frsky-xsr-2-4ghz-16ch-accst-receiver-w-s-bus-cppm.html
TBS Unify Pro 5G8 HV - Race (SMA) Video Transmitter $29.95
https://www.getfpv.com/tbs-unify-pro-hv-5g8-race-sma.html
https://www.team-blacksheep.com/products/prod:unify_pro_hv_race
5.8GHz Circular Polarized Antenna RHCP (Short)
https://www.ebay.com/itm/254921978065
Power HD DSM-44 Digital Metal Gear Micro Servo $8.40
http://www.valuehobby.com/power-hd-dsm-44-digital-micro-servo.html
3 Channel Switch Module FPV Video Switcher $5.00
https://www.ebay.com/itm/131631822928
https://www.getfpv.com/lumenier-3-way-video-switcher-board.html
5.6mm x 13mm M3 Nylon Threaded Spacer (10pc) $1.16
https://hobbyking.com/en_us/5-6mm-x-13mm-m3-nylon-threaded-spacer-10pc.html
Nylon Screw Phillips Head M3x8mm (10pcs) $0.86
https://hobbyking.com/en_us/nylon-screw-phillips-head-m3x8mm-10pcs.html
Click here to contact me
Back to etheli.com home page


